Category Archives: Maintenance

What does Wrench Light on Honda vehicles mean?

Most Honda vehicles have an indicator light on the dash that is yellow and shape of a wrench. The wrench light on Honda vehicles indicates nothing serious. You don’t have to worry when you see this light on the dash of your vehicle because it’s just a maintenance reminder light.

What exactly does the wrench light mean?

The wrench light on Honda turns on automatically when the oil life reaches 15%. And, it stays on until you reset the oil life. “Oil” mentioning here is the motor oil, which is the most frequently serviced maintenance item. The oil life is determined based on not only mileage and time since the last oil change but also how you drive the vehicle. For example, if you mainly drive in a city for a short distant frequently, the oil life reduces more quickly than the vehicle mainly driven on a highway. The vehicle computer monitors the sensors, collect the information, and reduce the oil life accordingly.

How to clear the wrench light and reset the oil life

After you change the oil, you have to reset the oil life to 100%. It doesn’t reset automatically. When you reset the oil life, the wrench light is also cleared and disappeared. Here is how to reset the oil life.

  1. Turn the ignition to ON position
  2. Press the Select/Reset knob or button until the oil life is shown on information display
  3. Press and hold the Select/Reset knob or button when the oil life is shown on information display until the oil life starts blinking.
  4. Press and hold the Select/Reset knob or button again while the oil life is blinking until the oil life change to 100%

Additional information about maintenance message

The information display shows a code along with the oil life. The code is a combination of alphabet (either A or B) and number(s) 1 through 6. Each alphabet and number has the following meaning.

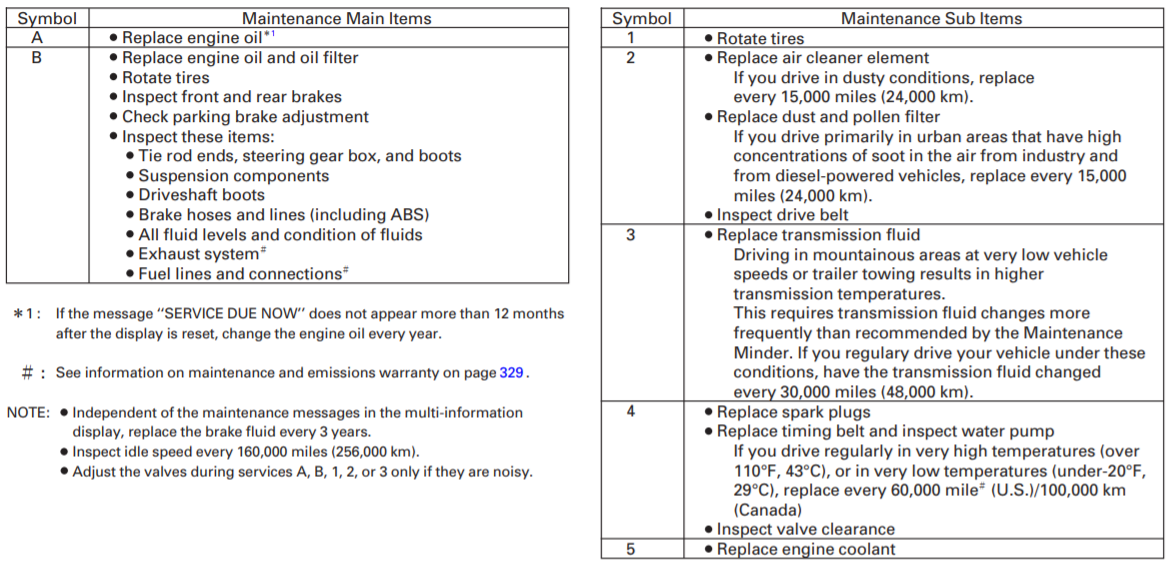
For example, when the information display says, “A13 OIL LIFE 15%”, it means an oil change, tire rotation, and transmission fluid change are due.

Conclusion

The wrench light on Honda vehicles is just a maintenance reminder light. The light is a part of Honda’s maintenance reminder system. The system also shows the oil life and other maintenance schedules. The system doesn’t only use time and mileage to determine the oil life and maintenance schedules but also information on how you drive. It may be important to follow the maintenance schedule especially if your vehicle is under warranty.

Read Also: What does Wrench Light on Ford vehicles mean?

How to clean the Throttle Body?

A throttle body of the vehicle with a lot of mileage may be dirty, and it needs to be cleaned up. The symptoms of a dirty throttle body is a rough idle, engine stalling, sticking gas pedal, hesitant acceleration, and so on. Here is the procedure on how to clean the throttle body.

  1. Remove the intake air duct
  2. Push the lever arm to open the throttle plate
  3. Spray a cleaner and wipe off the gunk with a rag
  4. Put back the intake air duct

If your car has an Electronic Throttle Body…

Please note that if your car has an electronic throttle body, do not push the throttle plate to open. The electronic throttle body is fully controlled by a vehicle computer. The motor inside the throttle body opens and closes the throttle plate. If you push the throttle plate by hand, the vehicle computer may lose the throttle position. That can create another problem, and things will even get worse. What’s more, you might need a scan tool to reset or perform the idle relearn procedure for the engine to retain the correct idle speed. So, keep that in mind, and here is how to clean the electronic throttle body.

image of electronic throttle body
  1. Have someone in a driver’s seat
  2. Turn the key on without a start
  3. Have someone press the gas pedal all the way
  4. Now, the throttle plate is open

If you are alone, put something heavy on the gas pedal. Make sure that it’s heavy and secure enough not to move and release the gas pedal while you’re cleaning. If it happens, all precautions and efforts may be wasted, you may be going to need to reset or relearn procedure.

Read Also: Does my car need Idle Relearn? What is throttle body relearn?

What to use for throttle body cleaning?

There is a cleaner that is specifically designed for cleaning the throttle body. It may be called Throttle Body Cleaner or Air Intake Cleaner. Don’t confuse with Brake Cleaner and Carburetor Cleaner. Brake Cleaner is a stronger solvent in cleaning perspective. It will damage a rubber, seal, sensors, or special coating on an inner wall of the throttle body. Some people say that you can use Carburetor Cleaner to clean the throttle body. Although it’s safe to use it, it’s not as effective as throttle body cleaner. Carburetor cleaner evaporates quicker than throttle body cleaner. You may need to spray more than Throttle body cleaner to clean up the same amount of dirt. A throttle body cleaner will leave a thin layer of lubricant on the inner wall of the throttle body, which helps to prevent the dirt and gunk from sticking in the future.

How does a throttle body get dirty, anyway?

You may wonder why a throttle body gets so dirty. Isn’t only air from the atmosphere pass through it. The answer is that it’s not only the air passing through it but also a vapor from a crankcase and blow-by. To understand this, you need to understand the Positive Crankcase Ventilation (PCV) system. The crankcase is a housing of a crankshaft below cylinders, and the motor oil lubricates moving parts inside the crankcase and cylinder walls. The crankcase has to be ventilated. If not ventilated, excessive pressure builds up inside the crankcase, and it breaks a seal and causes an oil leak, and many other bad things happen. So, it needs to be ventilated, but not directly to the atmosphere due to environmental issues. So, that’s where PCV system comes in.

image of pcv system

As in the image above, ventilated air from the crankcase sucks into the engine, and the fresh air from the atmosphere goes into the crankcase from the other pipe. As a car gets old and more mileage, a vapor accumulates inside of the throttle body as dirt and gunk. Plus, worn piston rings and oil rings on the cylinders allow combustion gas to escape to the crankcase (=blow-by), and that produces more vapor and make the throttle body dirty more quickly.

Conclusion

Cleaning the throttle body may solve idle related problems. Use Throttle Body Cleaner to do the job. If your car uses an electronic throttle body, never push the throttle plate by hand. Instead, have someone press the gas pedal with engine key on while you are cleaning the throttle body.

Do Oil Change Yourself – DIY Oil Change Tips and Tricks and Benefits

The oil change is one of the maintenance items. It’s basic and simple but crucial to prolong the engine life. If you do an oil change yourself, there are many benefits for you. This post shows you how to do an oil change yourself and also benefits when you do it yourself.

image of do an oil change yourself

Benefits on DIY oil change

  • Save you money -If you do the oil change yourself, you don’t have to pay the labor to a mechanic. You will need to buy some tools and equipment, but they cost you only once. After you buy the tools and equipment, all you need to pay for are motor oil and an oil filter. When you go online and search for the oil and filter, you can find ones at deeply discounted prices. For example, 5-quart full synthetic oil costs less than $20 at amazon.com. I have never used this brand of oil before, but according to reviews, it seems OK.
  • More cautious to engine condition – If you do the oil change yourself, you will become more perceptive and more understanding of the condition of the engine. Mechanics in a repair shop probably don’t pay much attention to the old oil draining from the oil pan, They throw the old oil to a big container mixing with the old oil from many other customer’s cars. But when you do it yourself, you can examine the old oil thoroughly. Then you can get information like whether or not it was enough oil in the engine, it was dirtier than usual, or there are debris and other particles.
  • Other benefits – The reason why an oil change is important is not only benefits directly from the new oil and filter, but also the opportunity to inspect other components of the vehicle. Under the hood, there are many other fluids to check. When the vehicle on the jack, you can check the front end. You can also perform tire rotation by using another jack stand. And then, you can also check the brakes as well. If you think they are too much for you to do, you take your car to a mechanic every two or three times of oil changes.

How to find the right oil and filter

An owner’s manual of your vehicles tells you how much oil and what “weight” you need. Weight actually means thickness or viscosity. It shows like 5W20, 10W30, 20W50, etc. The larger the number, the thicker. Just follow the recommendation on the owner’s manual. However, if your vehicle has a lot of mileage, it may be better to choose a thicker oil than the recommendation.

When you buy oil, I recommend to buy a jug of gallon or 5-quart rather than many 1-quart bottles. The reasons for that is you can use the jug as a container for old oil after you put new oil into the engine. It’s a hassle to divide old oil into many bottles. Old oil has to be recycled. You can take it to gas stations, or parts stores like Pep Boys. They usually take it for free.

To find the right oil filter of your vehicle, in parts stores, there is usually a book to tell you a part number by looking up with your vehicle’s year, make, and model. Or you can just ask a store clerk. If you purchase it online, websites of parts stores automatically show you the right filter of your vehicle after creating an account and entering your vehicle’s year, make and model.

Tools and Equipment needed for an oil change

  • Jack – It’s fine to use a scissor or screw jack which is one of original equipment usually found in the truck.
  • Jack Stands – Don’t ever use a jack alone. After lifting a car up, you should always put jack stands and sit vehicle’s weight on them for a safety.
  • Wheel Chocks – Optional. If you don’t have it, set an emergency brake for a similar advantage.
  • Socket Wrench – for loosen and tighten a drain plug. The size is not likely written on the owner’s manual. Neither is it on a repair manual. For the first time of changing the oil, you should bring the whole set of sockets or wrenches. But usually, the size of drain plugs are between 13mm and 19mm. (1/2-inch to 3/4-inch)
  • Oil Filter Pliers or Wrench – Metal oil filter can be loosen with the pliers. Paper filters are widely used on European vehicles. They can be accessed by opening a plastic lid. Don’t use pliers, or a plastic lid may get damaged. You should use an appropriate wrench, maybe a socket to open a lid.
  • Drain Pan – Choose the size of a drain pan which is more than enough. If it’s just enough, and old oil gets nearly to the edge of a drain pan, it is hard to put it into a container without spilling on the ground.
  • Funnel – It’s a must especially when you put oil oil into a container.
  • Rubber Gloves – Don’t use cloth or nylon gloves. They are useless when they got oil. For rubber gloves, you can wipe the oil off. You can’t do that on cloth or nylon gloves, and there is a risk getting a burn if you get a hot oil.
  • Rugs, Brake Cleaner – For cleaning hands, tools, and so on.

Tips and Tricks on Oil Change

  • Find a safe and level ground – Unless you have your own garage, you will have to do an oil change on a driveway or the side of the road. Find a level ground with less traffic, preferably one-way street.
  • Warm the engine before draining the oil – Warming the engine warms up the oil as well. That will allow the oil to drain smoothly. You don’t have to warm up too long. A few minutes are enough. If it’s cold weather, it may need a little longer than that.
  • Jack up on one side may be enough – Drain plugs are typically located on the lowest point of an oil pan. And many vehicles have a drain plug on the bottom of either side with an angle. So, jacking up on either side will help to drain the oil fast and thoroughly.
  • Set an emergency brake – After jacking up, set an emergency brake. It locks the rear wheels.
  • Use rubber gloves – You can wipe the oil off of rubber gloves easily. You can’t do that with cloth or nylon gloves. And you may get burned your hands when you have hot oil on cloth or nylon gloves.
  • When loosening a drain plug, apply slight pressure to the oil pan – After loosening a drain plug, unscrew it by hand with sightly pressing to the oil pan until you feel it got out of the thread. Make sure of the place of a drain pan while keeping pressing then take a drain plug away. Without pressing it, the oil flows out through the thread. And soon, the drain plug gets too hot to touch.
  • Use the same gasket unless it’s damaged – You can re-use the same gasket for a drain plug unless it’s damaged. It fits well most of the times.
  • Use a socket wrench only when loosening and tightening a drain plug – After loosening a drain plug, you should unscrew it by hand. When you re-install a drain plug, you should screw it by hand as much as possible then tighten with a socket wrench. This prevents the threads from damaging accidentally.
  • Gasket of oil filter is NOT reusable – Use a new gasket with a new oil filter. For metal oil filters, make sure that a gasket of an old oil filter doesn’t stick on the engine block and if there is a gasket on a new oil filter and properly seated. For paper oil filters, a gasket is on a lid. Change it to a new one, which should come with a new oil filter.
  • Check the oil level after starting the engine for seconds – Until starting the engine, the oil is not inside of a new oil filter. To make the oil flow to a new filter, you should start the engine until the oil-pressure indicator light goes off. Turn off the engine, and now you can check the correct oil level. Keep in mind that some cars take a little while to stabilize the oil level.

DIY vs. Quick Lube vs. Mechanic Garage

image of mechanic garage

DIY oil charge saves you money the most. Plus, you have free choices on the brand of an oil and filter. Quick Lube shops probably save you time the most. Many shops have cash wash, and you may get a free car wash with an oil change. The drawbacks of quick lube shops are they don’t lift the vehicle. They may check under the hood for you, but not on the front end, suspension, etc. And workers of quick lube shops may not be mechanics. They may not have much knowledge other than an oil change. Mechanic garages, on the other hand, lift the vehicles all the way up. It’s a great opportunity to ask a mechanic to check other components like brakes, front ends, mufflers, etc. But it all depends on garages, personalities of mechanics, and relationship with them. Whichever you end up with, it’s good for you to try to do an oil change yourself once.

Related Posts

Synthetic Motor Oil vs. Conventional Motor Oil

When you go to a quick lube place or mechanic garage for an oil change, you are probably asked which oil you’d like for your car. Does it simply mean you want to pay more for synthetic oil or less for conventional oil? What is exactly the difference? What’s the important factor of using synthetic motor oil vs. conventional motor oil?

image of oil change

What are Synthetic oil and Conventional oil?

Synthetic oil is artificially created engine lubricant. Some synthetic oil started with conventional oil as a base then chemically altered. And some other type of synthetic oil is created from other raw materials. Conventional oil is naturally refined from crude oil. It’s also called standard oil or mineral-based oil.

Advantages of Synthetic oil over Conventional oil

Synthetic oil is thinner, but resists high and low temperatures better, and lasts longer than conventional oil. While recommended change interval of conventional oil is 3,000 to 5,000 miles, recommended change interval of synthetic oil is around 7,500 miles.

How much do they cost?

image of amazonbasics full synthetic oil 5 quart

Synthetic oil can cost twice as much as conventional oil. However, you should take the longer interval into consideration. It can be cheaper because you don’t frequently pay the labor for oil change.

Do some cars requires synthetic oil?

Many late-models of European makes such as BMW, VW, Mercedes Benz, and Audi most likely require full synthetic oil. And newer Subaru, Honda, Toyota, and some high-performance vehicles also need to use synthetic oil. You can make sure of it by checking the owner’s manual. If the owner’s manual says synthetic oil is required, you should follow that. Otherwise, you may lose warranty coverage.

Should I use Synthetic oil or Conventional oil?

If your owner’s manual doesn’t mention about use of synthetic oil, is it still worth using synthetic oil for your car? You should consider two things.

First, how often you prefer to change the oil. If you are lazy and tend to postpone the oil change, you’d better use synthetic. As mentioned above, synthetic oil can last longer than conventional oil. A short life of conventional oil may break down while you postpone the oil change, and it may cause an expensive repair in the future.

Second, it depends where you drive. If you live in a place with extreme temperatures, you should use synthetic oil. In severe weather, high or low temperature, Synthetic oil maintains its viscosity better than conventional oil. It’s one of the reasons synthetic oil has been developed in the first place.

Conclusion

image of maintenance motor oil

To find out which oil is the better for your car, you should check your owner’s manual first. Then, think about climate or weather of the area you drive and take this into consideration. And also ask yourself if you are strict about the oil change interval. Regardless of choice, oil change is one of the most important maintenance jobs. You should never neglect it. It must be done regularly.

Related Posts

Timing Belt Replacement Guide – read this if you DIY timing belt replacement

Timing belt is a significant role on vehicle’s engine. Unlike other belts such as serpentine, v-belt, and accessory belts, they are hidden by covers. It’s not necessary to check often. But you need to follow the recommendation of change interval on a repair manual. This post is timing belt replacement guide.

image of timing belt replacement

What is a timing belt?

A timing belt is driven by a crankshaft, and it rotates camshaft(s) in the proper sequence. The proper sequence is accomplished by aligning marks on the camshaft and crankshaft sprockets when you install a timing belt. This sequence allows the intake and exhaust valves to open and close at the exact timing along with the position of the piston.

How does a timing belt look?

image of timing belt

Timing belts are much wider than serpentine belts or v-belts. They are flat and thin, but they have teeth on one side. These teeth mesh with the sprockets of camshaft and crankshaft and rotate them all together without slipping.

When to replace a timing belt

You can find change interval of the timing belt on an owner’s manual or repair manual. It ranges from 60,000 to 105,000 miles. And a timing belt needs to be replaced when related components such as a water pump and oil pump need to be replaced. On many models, these components are driven by a timing belt, and a timing belt has to be removed when you replace these components. In this case, you have to replace a timing belt to a new one for two reasons. One of the reasons is that a lot of work has to be done to replace these components. The other reason is that a timing belt may be contaminated by water or oil and shortened its life.

What happens when a timing belt breaks

Image of bent valves

A pair of Poppet valves bent by collision with a piston after timing belt breakage at 4500 RPM

First of all, a broken timing belt can never start the engine. If a timing belt breaks when the engine is running, it may cause extensive damages to the engine. On some engine, intake valves have to be closed when pistons are at the top dead center. Otherwise, they can hit and damage each other. Whether your car has this type of engine or not, it’s wise to follow the change interval on a repair manual to avoid this incident as much as possible.

A time belt or a timing chain?

image of timing chain

Some cars use a timing chain instead of a belt. A timing chain usually doesn’t need to be replaced. If you are not sure which one your car uses, you see that in an owner’s manual or a repair manual. For your information, a cover of a timing chain is most likely metal and completely sealed. That’s because a timing chain has to lubricated by motor oil. A cover of a timing belt, on the other hand, is most likely plastic. And there is no need for sealing completely. You can even peek at a timing belt by removing a few bolts on the cover and making a room.

Tools for timing belt removal and installation

Depending on a car model, you may need special tools for timing belt removal and installation. For example, you may need a belt tension gauge, tensioner adjuster tool, crankshaft wrench tool, etc. This information is not on an owner’s manual but a repair manual. It’s important to know the tools you need and have them before starting a job.

Conclusion

Replacing a timing belt usually take you hours of work. Think about replacing other items because only accessing a timing belt requires a lot of works. For example, a water pump is driven by a timing belt on many car models. It highly recommends replacing a water pump as well when you replace a timing belt. Don’t forget about tools you may need for timing belt removal and installation. All the information has to be gathered from a repair manual before you start a job. This initial work will save you time in the end.

image of timing belt alignment marks

How To Do It Yourself Auto Repair

You should know how to fix your car before you start a job. Otherwise, you will waste your time by opening up some other parts that are not related with the problem or going to a parts store to buy extra parts and tools. Preparing for everything lets you save your time and fix your car easily. Let’s see more details how to do it yourself auto repair.

There are auto repair manuals because you can look up not only when you get lost in the middle of the job, but also before you start the job. You can get the outline of each job, tools you need for a repair, or you can tell how long it normally takes to finish a job so you choose the best time to do it without a rush.

Repair manuals tell you whether you need to use a jack and crawl under the car. This helps you decide where to repair your car. You do not want to do this kind of jobs on a dirty ground. Even if the ground is clean but dangerous to use a jack for some reasons such as it is not level, or there is no room to place a jack when you work in your tiny garage, you will have to change the work place. Imagine all procedures of the job you are going to do and you can pick the best place and position for the job.

As for tools, you should own a basic mechanic tool set for any kinds of job. Buying a set is much cheaper than buying items one by one. You should own a basic size range of sockets and wrenches, 1/4, 3/8, and 1/2 ratchets and extensions, pliers and screwdrivers, and so on. You will buy the other tools individually when you need them.

To do auto repair, you need not only tools ,but also some equipment sometimes. If a job is a water pump replacement or a radiator change, you do not forget about a container to catch anti-freeze: however, there are many repairs that require to disconnect coolant hoses and drain anti-freeze. Whether you work on a street or in your home garage, you should not mess up the ground.

As you see, looking up information in auto repair manuals in advance have many benefits. You can save your time, perform a job smoothly without hassles, and keep your work place clean so that you will contribute to protect the environment.