Author Archives: admin

How to retrieve Acura and Honda Radio Code

After you have major repairs or just a battery replacement, you see a message on a display of a car radio or navigation system asking a code. Until you enter the right code, you can’t use the radio or navigation system. There are some places you retrieve Acura and Honda radio code. This information applies on most Acura and Honda vehicles.

From an Anti-Theft ID Card

The code and serial number for the radio and navigation is written on an anti-theft ID card. The dealer recommends you to keep the card somewhere safe outside the vehicle. So, if you never pay attention to this card, it is most likely in a folder of an owner’s manual and warranty booklet, etc.

A sticker on a glove box

If you can’t find the card, look at the side of the glove compartment. You can find a sticker with the code and serial number on the inner wall of the glove compartment. Unlike a card, it may just show the code and serial number without telling what they are for. But, now you know. The code is likely only numbers of 4 or 5-digit, and the serial number is likely around 10-digit alpha-numeric.

Through a website

In case you don’t find either a card or a sticker, you still can retrieve that through a website. You will need to enter the following information to retrieve the code through a website.

Name, Address, Email address, Phone number, VIN, and Serial number.

Where can I find VIN?

VIN stands for Vehicle Identification Number. It is 17-digit alpha-numeric. It’s like a serial number of a vehicle. Any car has it. You can find that on several places.

  • On the vehicle’s registration
  • On your insurance card or statement
  • At the corner of dashboard on the driver’s side (looking through the windshield from outside)
  • On a sticker inside the area where the driver’s side door latches to the car

How to retrieve the serial number? (2001 and newer vehicles except 2003 – 2007 Accord w/navigation system)

1) Turn the ignition switch to ON.
2) Turn ON the device and confirm that the display reads COdE. If you don’t see this message, pull the backup fuse for 1 minute, and then go back to step 1.
3) Turn OFF the device.
4) Press and hold the 1 and 6 radio preset buttons, and turn ON the device.
5) The display toggles between two screens: U with the first 4 digits of the serial number (U2200 for example,)
6) And L with the last 4 digits of the serial number (L0055 for example.)
7) Ignore the U and L and record all 8 digits

https://radio-navicode.honda.com/

How to retrieve the serial number? (2003 – 2007 Accord w/navigation system)

1) Turn the ignition switch to ACC (I).
2) Turn on the audio unit, and make sure you see COdE in the upper display. If you don’t see this message, pull the backup fuse for 1 minute, and then go back to step 1.
3) Turn off the audio unit.
4) Press and hold the top halves of the SEEK/SKIP and CH/DISC bars, and then press and release the PWR/VOL knob. This display toggles between two screens.
5) The first screen displays a U and the first four digits of the serial number (for example, U2200).
6) The second screen displays an L and the last four digits of the serial number (for example, L0055).
7) Ignore the U and L, and write down all eight digits.

https://radio-navicode.honda.com/

How to retrieve the serial number? (2000 and older vehicles)

The serial number is on the back of the radio unit. So, you need to pull out the radio unit from the dash. A procedure of radio removal and installation varies from models to models. It’s recommended to obtain and refer to your vehicle’s repair manual for the radio removal and installation, otherwise you may damage the radio unit or dash.

When you have all information, go to https://radio-navicode.honda.com/ (or https://radio-navicode.acura.com/ for Acura vehicles) and enter all information. You will receive the code in no time.
Acura and Honda Power Window Problems

After you have a major repairs that require to disconnect the battery, you may notice your Acura or Honda power window problems. Although you can open and close the windows by pressing or pulling the buttons, AUTO UP and AUTO DOWN features don’t work.

AUTO DOWN is the feature that pressing the button firmly down opens the windows all the way. And AUTO UP is the feature that pulling the button firmly back closes the window all the way so you don’t have to keep pressing or pulling the button.

If you experience this problem, all you need is reset the power window control unit. Here is the procedure.

1) Turn the ignition switch ON (II).
2) Move the driver’s (or the front passenger’s) window all the way down by using the driver’s window DOWN switch.
3) Open the driver’s door.
Note: Steps 4 to 7 must be done within 5 seconds of each other.
4) Turn the ignition switch OFF.
5) Push and hold the driver’s (or the front passenger’s) window DOWN switch.
6) Turn the ignition switch ON (II).
7) Release the driver’s (or the front passenger’s) window DOWN switch.
8) Repeat steps 4 to 7 three more times.
9) Wait 1 second.
10) Confirm AUTO UP and AUTO DOWN do not work. If AUTO UP and DOWN work, go back to step 1.
11) Move the driver’s (or the front passenger’s) window all the way down by using the drivers (or the front passenger’s) window DOWN switch.
12) Pull up and hold the driver’s (or the front passenger’s) window UP switch until the window reaches the fully closed position, then continue to hold the switch for 1 second.
13) Confirm that the power window control unit is reset by using the driver’s (or the front passenger’s) window AUTO UP and AUTO DOWN functions.

If the window still does not work in AUTO, repeat the procedures several times, paying close attention to the 5 second time limit between steps.

ALLDATA ver 10.50

If you go to the dealer to fix this problem, you may be charged for half an hour labor cost. This procedure is written on the owner’s manual. This is a good example that the owner’s manual is somehow neglected but actually it’s a great source of information about your very own vehicle.

And, it’s the common procedure among Acura and Honda vehicles with AUTO UP/DOWN features.

Related Post

Acura and Honda Idle Relearn Procedure

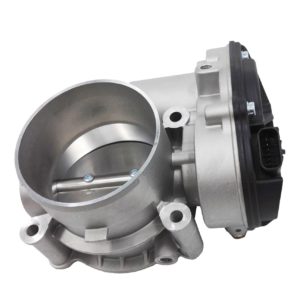
Late models of Acura and Honda vehicles equip an electronic throttle body (ETB). The ETB is fully controlled by a vehicle computer. The vehicle with the ETB has no longer mechanical cable between the throttle body and accelerator pedal. Instead, the computer sends a signal to the ETB to open and close the throttle plate based on the parameters of various sensors throughout the vehicle. After you replace or clean the ETB, reset the vehicle computer, you will need to have the computer relearn the right throttle position and parameters of other sensors. Here is the Acura and Honda idle relearn procedure.

1) Make sure all electrical items (A/C, audio, lights, etc) are off.

2) Reset the ECM/PCM with the HDS.

3) Turn the ignition switch to ON (II), and wait 2 seconds.

4) Start the engine. Hold the engine speed at 3,000 rpm without load (A/T in P or N, M/T in neutral) until the radiator fan comes on, or until the engine coolant temperature reaches 194°F (90°C).

5) Let the engine idle for about 5 minutes with the throttle fully closed.

NOTE: If the radiator fan comes on, do not include its running time in the 5 minutes.

ALLDATA Ver. 10.50PE

HDS stands for Honda Diagnostic System. In the step 2 of this procedure, it’s referring to Honda’s OBD software and/or hardware. If you don’t have one, you may be able to reset ECM/PCM with an aftermarket OBD scan tool. If not, disconnect a battery for about 15 minutes.

The last step of the procedure, you shouldn’t include time while a radiator fan is spinning into the 5-minute idling time. So, be aware that it takes longer than 5 minutes in most cases.

Related Posts

What does Wrench Light on Honda vehicles mean?

Most Honda vehicles have an indicator light on the dash that is yellow and shape of a wrench. The wrench light on Honda vehicles indicates nothing serious. You don’t have to worry when you see this light on the dash of your vehicle because it’s just a maintenance reminder light.

What exactly does the wrench light mean?

The wrench light on Honda turns on automatically when the oil life reaches 15%. And, it stays on until you reset the oil life. “Oil” mentioning here is the motor oil, which is the most frequently serviced maintenance item. The oil life is determined based on not only mileage and time since the last oil change but also how you drive the vehicle. For example, if you mainly drive in a city for a short distant frequently, the oil life reduces more quickly than the vehicle mainly driven on a highway. The vehicle computer monitors the sensors, collect the information, and reduce the oil life accordingly.

How to clear the wrench light and reset the oil life

After you change the oil, you have to reset the oil life to 100%. It doesn’t reset automatically. When you reset the oil life, the wrench light is also cleared and disappeared. Here is how to reset the oil life.

  1. Turn the ignition to ON position
  2. Press the Select/Reset knob or button until the oil life is shown on information display
  3. Press and hold the Select/Reset knob or button when the oil life is shown on information display until the oil life starts blinking.
  4. Press and hold the Select/Reset knob or button again while the oil life is blinking until the oil life change to 100%

Additional information about maintenance message

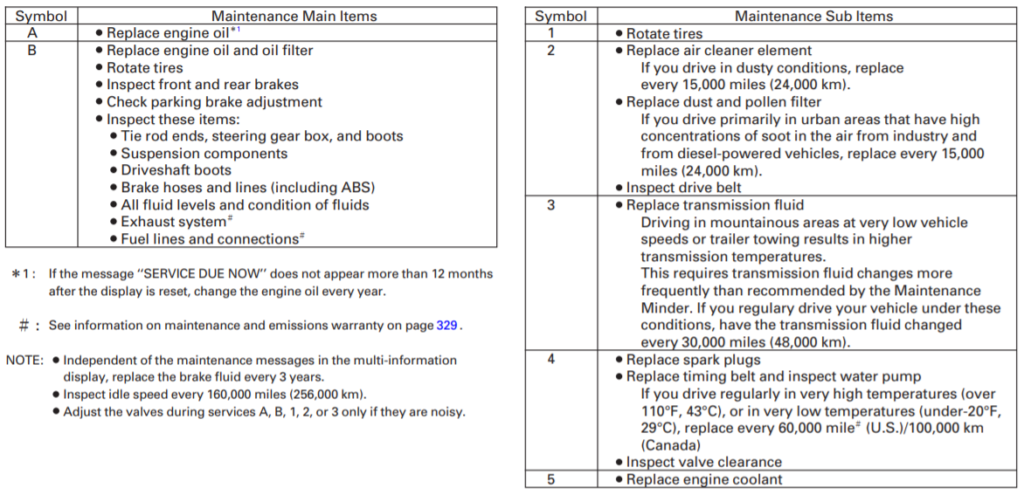
The information display shows a code along with the oil life. The code is a combination of alphabet (either A or B) and number(s) 1 through 6. Each alphabet and number has the following meaning.

For example, when the information display says, “A13 OIL LIFE 15%”, it means an oil change, tire rotation, and transmission fluid change are due.

Conclusion

The wrench light on Honda vehicles is just a maintenance reminder light. The light is a part of Honda’s maintenance reminder system. The system also shows the oil life and other maintenance schedules. The system doesn’t only use time and mileage to determine the oil life and maintenance schedules but also information on how you drive. It may be important to follow the maintenance schedule especially if your vehicle is under warranty.

Read Also: What does Wrench Light on Ford vehicles mean?

What does Wrench Light on Ford vehicles mean?

Late models of Ford, especially AWD or 4WD vehicles have the warning light that is amber and shape of a wrench. The wrench light on Ford vehicles is a powertrain malfunction indicator light. When the vehicle computer detects a problem on the engine or transmission, it turns on the wrench light and restricts the vehicle performance.

What does the wrench light mean?

The meaning of the wrench light roughly the same as the check engine light. When the computer detects on the engine or transmission, it turns on the wrench light. You may see the check engine light on at the same or later on.

What is the difference between Check Engine Light and Wrench Light?

Two indicator lights have many things in common. They may illuminate at the same time. The difference is that the wrench light is a part of the Ford manufacturer’s own warning system while the check engine light is a part of On-Board Diagnostics (OBD) system that is standardized on all vehicles manufactured in the U.S. of the model year 1996 and later. And the wrench light indicates the related problems limited to throttle control and transmission.

What to do when the wrench light comes on?

First of all, you may not have many choices other than pulling over because a vehicle may be heavily restricted acceleration or shifting on transmission. What is important is what to do after pulling over the vehicle.

The computer most likely store the diagnostic trouble codes (DTCs), even if the check engine light isn’t on. Pending codes don’t turn on the check engine light. If you have an OBD scan tool, get the codes. If you don’t have one, go to a local parts store, and they may scan the computer for you for free. Your vehicle may be in the condition that is too hard to get to the stores because of reduced engine power. In that case, turn off the engine and restart after a while, and the wrench light may disappear, and your car may start and drive as if nothing has happened. However, as long as the problem exists, the light will come back on. So, it’s important to scan the computer and get the DTCs as soon as possible.

If restarting the engine fixes the problems temporarily, you may perform self-diagnosis as long as you are comfortable to do so. It means that you can try to find when exactly the wrench light comes on. For example, you do this a couple of times and find out that the wrench light comes on every time the car shifts to the 3rd gear. From this, you can guess the cause of the problem would be in the transmission. Even though you’re not a DIYer, this information will help a mechanic diagnose and fix the wrench light problem.

If you are considering buying an OBD scan tool, please note that most cheap OBD scan tools aren’t capable of reading the pending codes and the manufacturers specific codes, (B-codes, C-codes, or U-codes, neither.) In my experience, most of the time, the wrench light comes with the manufacturer’s specific codes, which start with P1xxx. So, you will need a good one. It used to be that only professional-grade scan tools which cost thousands of dollars could get all these codes. But now you can buy one for a fraction of costs. BlueDriver is an OBD scan tool that works with a smartphone’s app. For selected manufacturers including Ford, you can get all these codes.

Getting DTCs is one thing you must do when the wrench light comes on, and checking an electronic throttle body (ETB) is another, especially your vehicle has a lot of mileage. A carbon build-up and sticky gunk inside the ETB can affect the movement of the throttle plate and confuse the computer finding the right throttle position. When it happens, the computer turns on the wrench light and puts the engine into the limp home mode. So, if it’s dirty, clean up the ETB with an appropriate cleaner and perform the idle relearn procedure.

Read Also: How to clean the Throttle Body?, Ford Idle Relearn Procedure

Don’t confuse with the oil change reminder light

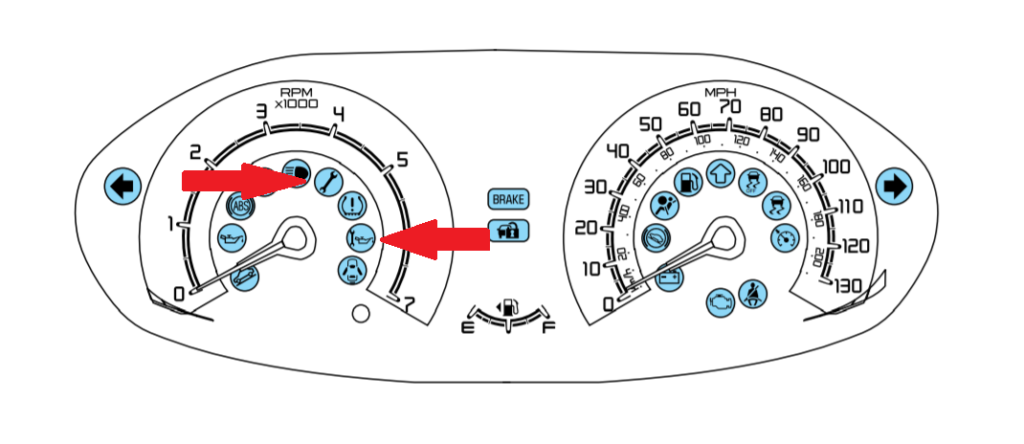
image of 2011 ford fiesta wrench light and oil change reminder light

Some people confuse the wrench light with an oil change reminder light. Many YouTube videos show how to reset the oil life on Ford vehicles. But a few videos mistakenly treat the wrench light as the oil reminder light. The videos show how to reset the oil change reminder light correctly. But these two lights have a totally different meaning. One is a warning light, and the other is just a reminder light. Only a few models and years have this indicator light. As long as I know, they are Ford Fiesta 2011, 2012, and 2013. Other models and even newer models of Fiesta don’t have one. Instead, most Ford vehicles remind you by showing the message “Engine oil change due” on the information display. The procedures of resetting the oil life are almost the same.

Conclusion

The wrench light is a powertrain malfunction indicator light. When it comes on, you may experience a severe reduction in the vehicle’s performance. The causes of the problem lie on throttle control and/or transmission. The light may come on along with the check engine light. Whether the check engine light is on or not, get the codes with a good OBD scan tool and narrow down the possible causes of the problem. You also need to check inside of the throttle body. If it’s dirty, clean it up and perform idle relearn.

What is Engine Power Reduced message on GM vehicles?

“Engine Power is Reduced,” this message can be seen on the dashboard of GM vehicles, which have an electronic throttle body (ETB). Those vehicles have no mechanic cable connecting the throttle plate and accelerator pedal. The electric motor inside the throttle body opens and closes the throttle plate, and a vehicle computer fully controls the movement of the plate by sending a signal to the motor. When the computer detects something wrong with the engine, it shows “engine power reduced” message and may put the engine into “limp home” mode.

What to do when Engine Power Reduced message comes on?

It depends on the problems. Interestingly, the vehicle acts differently depending on the type of the problem. Some obvious problem, overheat, for example, the message shows up, and a coolant-temperature-warning light illuminates as well. The acceleration and speed are heavily restricted. In this case, you have to stop the vehicle right away and cool it down. Sometimes, however, you don’t see any reduction in performance although the message says “Engine Power is Reduced.” In this case, you may drive to the destination. But, the engine performance may be reduced next time you drive. So, whenever you see this message, consider getting off the road and out of traffic for an emergency stop, or going to see a mechanic or straight home to diagnose the problems as soon as possible.

Common Causes of Engine Power Reduced

If you have the message with the check engine light on, get the diagnostic trouble codes with an OBD scan tool. You may see P0120 thru P0124, P1516, P2135 thru P2140. All these codes are related to an electronic throttle body (ETB). If your vehicle has a lot of mileage, the inside of throttle body may be dirty and sticky. An excessive carbon built-up affects idle speed, and a sticky throttle plate can cause a hesitant acceleration. Both of them confuse the computer finding the right throttle position, and it sets one or more of the trouble codes above. So, if it’s dirty, clean it up with an appropriate cleaner and perform the idle relearn procedure.

Read Also: How to clean the Throttle Body?

Sometimes, a throttle position sensor (TPS) can be faulty and set the codes above. While most TPSs for the other manufacturers comes in one assembly with the throttle body, TPS for GM can be separate from an ETB and replaced relatively easily. You can save money by replacing the TPS only instead of replacing the whole assembly. TPS alone may cost around $100 less than the whole assembly, and it may come with a new harness.

But, please make sure that you may still need to clean up the throttle body if it’s dirty and perform the idle relearn procedure. And, be aware the electric motor which opens and closes the throttle plate is integrated into the throttle body. So, if the problem lies on the electric motor (as well as gears and pinions), replacing TPS won’t fix the problem.

Read Also: GM Idle Relearn Procedure

Another common and possible cause related the ETB is a damaged harness or wires attached to an ETB. Most of GM’s ETBs have either 6 or 8-pin connector. These connectors are not that reliable. If you wiggle each wire, and the engine shows any kinds of reaction like an RPM surge, drop, or even an engine stall, you need to fix the harness. Fortunately, you can buy the new harness alone. It costs much less than the TPS or ETB. But, remember you still need the idle relearn procedure after the replacement.

Conclusion

Engine Power Reduced is the message that the vehicle computer informs you that something wrong with the engine. At the same time, the computer can fully control and limit performance thanks to modern vehicle’s technology. You might think it’s annoying, but it actually protects the engine from further damages. So, whenever you see the message, act appropriately. Sometimes, you may not feel much reduction in performance. Even so, you should diagnose and find the cause of the problem as soon as possible.

GM Idle Relearn Procedure

After replacing a throttle body of late models of GM vehicle, a vehicle computer must relearn the idle position. Late models of GM vehicles equip an electronic throttle body (ETB), which eliminates the need for an idle air control valve and a physical cable between the throttle plate and accelerator pedal. The ETB is fully controlled by the vehicle computer, and it adjusts the opening to maintain the idle speed with specification and respond to accelerator pedal movement. In the event of losing the communication between the ETB and the computer such as a dead battery, cleaning or replacing an ETB, etc., the computer must relearn the new throttle position. Here is GM idle relearn procedure.


Perform the following relearn procedure for the on-board computer to adjust to the new idle position on the electronic throttle body.


1) Start and run the engine in PARK for 3 minutes.
2) Turn the engine OFF for a minimum of 60 seconds.
3) Start the engine and run for another 3 minutes.
4) Engine should idle normally after 3 minutes.


After having performed the relearn procedure and the engine still does not run within normal idle speed, it will be necessary to drive the vehicle above 45 mph (70 Km/h) including several decelerations.

Also ensure that after driving the vehicle, let the engine idle for a minimum of 5 minutes. If the engine has returned to normal idle speed, the relearn procedure is completed. If the idle speed is still erratic or incorrect, restart idle relearn procedure.

https://www.rockauto.com/genImages/22/BOU-AVM-1-I-080B.pdf

Please note that you need to clear the diagnostic trouble codes (DTCs) before performing the procedure. If you don’t have a scan tool, you can clear by disconnecting a negative battery cable for around 15 minutes.

“Engine Power is Reduced” message

Many General Motors vehicle owners have experienced the “Engine Power is Reduced” message on the dashboard. When the computer detects the problem, it puts the vehicle into the limp mode for safety. It literally reduces the engine power and disables the traction and stability controls. There are many possible causes for the message to show up. A dirty and sticky throttle plate can be the cause, and a faulty throttle position sensor can be another.

You don’t have to panic when you see this message. If the DTCs are set (=check engine light is on) with this message, just scan the computer and get the codes. You may get P0120 through P0124 or manufacturer specific code P1516,P2135, or P2140. All these codes are related to the electronic throttle body. A sticky throttle plate and/or a faulty throttle position sensor are the most common cause of the problem. Keep that in mind, when you see this message, take a look at the throttle plate. If it’s dirty, clean it up and perform the idle relearn procedure, and it may fix the problem.

Related Posts

Ford Idle Relearn Procedure

image of ford electronic throttle body

If you are experiencing a rough idle on your vehicle after you disconnect a battery for any reasons, you need to perform the idle relearn procedure. Late models of Ford vehicles equip an electronic throttle body (ETB), which is fully controlled by a vehicle computer. An ETB eliminates the need for an idle air control valve and a physical linkage between an accelerator pedal and throttle plate. Instead, the vehicle computer controls all these things by sending a signal to a motor inside the ETB based on the readings from various sensors. When disconnecting a battery, the computer loses communication with the sensors, as well as memories that have been stored in the computer The communication must be re-established by performing the following Ford idle relearn procedure.

Please note that there are a few different procedures depending models and years. The procedure below is common in most 2000’s Ford vehicles.

Because your vehicle’s engine is electronically controlled by a computer, some control conditions are maintained by power from the battery. When the battery is disconnected or a new battery is installed, the engine must relearn its idle and fuel trim strategy for optimum driveability and performance. To begin this process:

1. With the vehicle at a complete stop, set the parking brake.

2. Put the gearshift in P (Park), turn off all accessories and start the engine.

3. Run the engine until it reaches normal operating temperature.

4. Allow the engine to idle for at least one minute.

5. Turn the A/C on and allow the engine to idle for at least one minute.

6. Release the parking brake. With your foot on the brake pedal and with the A/C on, put the vehicle in D (Drive) and allow the engine to idle for at least one minute.

7. Drive the vehicle to complete the relearning process.

• The vehicle may need to be driven 10 miles (16 km) or more to relearn the idle and fuel trim strategy.

• If you do not allow the engine to relearn its idle trim, the idle quality of your vehicle may be adversely affected until the idle trim is eventually relearned.

http://www.fordservicecontent.com/Ford_Content/catalog/owner_guides/05219og3e.pdf

Refer to your owner’s manual for the specific idle relearn procedure of your vehicle

The Ford idle relearn procedure is written in a section of battery’s maintenance and specification on an owner’s manual. It’s a good example that owner’s manuals are somewhat neglected, but actually a great source of information for your very own vehicles.

Read Also: Missing Car Owner’s Manual? You can download owner’s manual for free

Please note that this procedure is necessary for around 2000’s models of Ford vehicles. The newer models may need a different procedure from the one above. For example, just letting it idle for several minutes will have the computer relearn idle condition or the slightly different but mostly the same procedure as one above. Anyway, refer to your owner’s manual, and you will find the specific procedure for your vehicle.

The procedure is also called Battery Relearn among Ford owners in their forums, but it’s just the same thing as idle relearn, throttle relearn, resetting, calibration, etc.

Related Posts

Nissan Idle Relearn Procedure

Late models of Nissan vehicles equip an electronic throttle body (ETB), which is fully controlled by a vehicle computer. After you replace an ETB, you will need to have the computer relearn the position of the throttle plate to maintain the correct idle speed. Sometimes, other repairs such as a battery replacement and ETB clean-up may cause the idling to act up. This problem may turn on Service Engine Soon light (=check engine light) and store the trouble code P0507 – Idle speed control system RPM higher than expected. If you are in this situation, you need to perform this Nissan idle relearn procedure below.


STEP 1: ACCELERATOR PEDAL RELEASE POSITION LEARNING
1) Do not depress the accelerator pedal
2) Turn the key to the ON position for at least 2 seconds
3) Turn the key to the OFF position for 10 seconds
4) Turn the key to the ON position for 2 seconds
5) Turn the key to the OFF position for 10 seconds
STEP 2: THROTTLE VALVE CLOSE POSITION LEARNING
1) Do not depress the accelerator pedal
2) Turn the key to the ON position for 10 seconds
3) Turn the key to the OFF position and listen for the throttle body making a whining sound
STEP 3: IDLE AIR VOLUME LEARNING
1) Run the vehicle up the operating temperature with the vehicle in park, the steering wheel straightened, and the headlights and A/C and other electrical loads off
2) At idle, make sure the vehicle has more than 12.9 volts at the battery
3) Let the vehicle reach up to temp
4) Turn the vehicle off
5) Let the ignition be off for 10 seconds
6) Do not depress the accelerator pedal
7) Turn the key to the ON position and wait 3 seconds
8) Press the accelerator pedal five times in 5 seconds
9) Wait for 7 seconds
10) Check engine light should flash
11) Hold the accelerator pedal down for 20 seconds
12) Release the accelerator pedal within 3 seconds when the engine light stops blinking
13) Start the engine and let it idle
14) Rev the engine a couple of times
15) Confirm the engine returns to the correct idle (around 700 RPM in park for automatic transmission)
16) Confirm there is no check engine light

https://www.1aauto.com/how-to-reprogram-your-new-throttle-body-02-06-nissan-altima/video/13155

The procedure is kind of tricky. The timing is critical. A stopwatch may help you perform the procedure with precise timing. Before the procedure, Service Engine Soon light needs to be cleared by disconnecting a battery cable for at least 30 seconds.

The procedure is necessary after replacing an ETB, disconnecting a batter, and so on. The idling starts acting up all of a sudden, something else may be the cause of the problem. So, if Service Engine Soon light is on, it is important to scan the computer, read and take notes of all codes. You might as well perform and see if it will fix the problem because the procedure doesn’t require any special tools. But if the same symptom exists or comes back, you can start diagnosing based on the codes on the notes you take before the procedure.

Related Posts

Subaru Idle Relearn Procedure

If your car has a problem like a rough idle, idling too high or low, and engine stalling, you may need idle relearn procedure. Vehicles with Electronic Throttle body is fully controlled by a vehicle computer. If something cuts the communication between these two devices and erases the memory in the computer, idle is erratic until the computer relearns the throttle position and re-establish the communication with the ETB. Here is the idle relearn procedure for Subaru vehicle.

1) Turn off the lights, aircon, stereo or any system in the car that draws extra current on top of the engine.
2) Disconnect the battery for 30 mins.
3) Reconnect the battery.
4) Before you start the car for the first time, turn the key to the ON position but do NOT turn the engine over. Wait 10-15 seconds so the electronic throttle body or IACV has time to go to the factory programmed home position.
5) After waiting, start the car and let it idle without any load, lights, A/C etc.
6) Every 20 seconds or so the idle will be adjusted up and down as the ECU tries to adjust it towards a stoichiometric fuel / air mix.
7) Leave the engine running for a full 10 mins but DO NOT TOUCH THE ACCELERATOR during this time or turn on anything that will cause extra electrical current draw.
8) Turn off the engine, and leave the key in the OFF position for at least 20 sec.
9) As per step (4) turn the key back to the ON position for 10-15 sec without actually starting the engine.
10) Start the engine and leave to idle for a further 5 minutes without touching the accelerator and without turning on other systems in the car.
11) Turn off the engine again and wait at least 20 sec before restarting.
12) Take the car for a test drive as the ECU should now be fully retrained.

https://www.subaruforester.org/vbulletin/f113/how-idle-re-learn-after-battery-disconnect-154161/

As mentioned above, the procedure is necessary when you have idling issues AFTER doing something like disconnecting a battery, replacing an ETB, clearing the check engine light, etc. If idling goes erratic all of a sudden, probably the procedure doesn’t help. The cause of the problem is likely something else.

Here is what happened to my 2006 Subaru Forester.

The idling became erratic and then stayed low after I had cleared an OBD trouble code. The code had something to do with oil pressure (P0522 – Engine Oil Pressure Sensor/Switch Low Input). Just before I got this code, I changed motor oil myself. I put Lucas Oil Heavy Duty Oil Stabilizer, plus it was a cold Winter day. I guess these things took more time than usual to circulate the oil in the engine and caused the check engine light to come on. I double-checked everything was put back and tight and cleared the code. Then, the idling became erratic.

At first, it went up and down, and then stayed around 500 RPM. The engine stalled several times when I stopped at traffic light. Finally, the check engine light came on with the code P0506 – Idle Control System RPM Lower Than Expected.

I suspected my car needed to relearn the idle speed but didn’t know the procedure. I tried to do my own way by leaving the key on for 5 minutes, then start and let it idle for 5 minutes, which may work on vehicles with IAC valve on the non-electronic throttle body, but it didn’t work on my car. I searched online and soon found the procedure above. I performed it, and it worked. The idle speed got back to normal (around 750 RPM), and the engine won’t stall anymore.

Conclusion

Some people says that if you drive for a while without performing a specific procedure, the computer relearns automatically. It may be true. However, you will experience the difficulty in your driving until the computer finishes to relearn. Besides, you don’t know when it will finish, or you don’t even know whether or not it will finish. What’s more, it is dangerous that the engine stalls when you’re driving on the road. So, if you have idle issues after you’ve done something like disconnecting a battery or clearing the code, you’d better perform the idle relearn procedure.

Related Posts